Know All About Office 365 Groups & How to Create Them!
Confused, about what are Office 365 Groups? To put it simply, Microsoft 365 Groups are a service designed to share workspace emails, files, events, meeting notes, and conversations. These can be used to collaborate with teammates when writing documents, working on project plans, creating spreadsheets, etc. across your company.
Table of Contents
- What is Office 365 Groups ?
- Which O365 Plans Have Groups?
- Create Groups in M365 Business/Enterprise Plans
- Make an O365 Group for Outlook Outlook Web
- Group Construction in Outlook Client
- Workloads in Microsoft 365 Group
- Converse using Groups
- Microsoft 365 Group Types
- Move a O365 Group
- Conclusion
- FAQs
This blog will help you to know what these groups are exactly, their workloads, & how to create the said Groups.
What are Office 365 Groups?
Even when users hold strong positions on the choice between Office 365 vs Microsoft 365 enterprise editions. They are in agreement even after most Office 365 plans rebranded to Microsoft 365 groups are among the best services common in both the cloud plans.
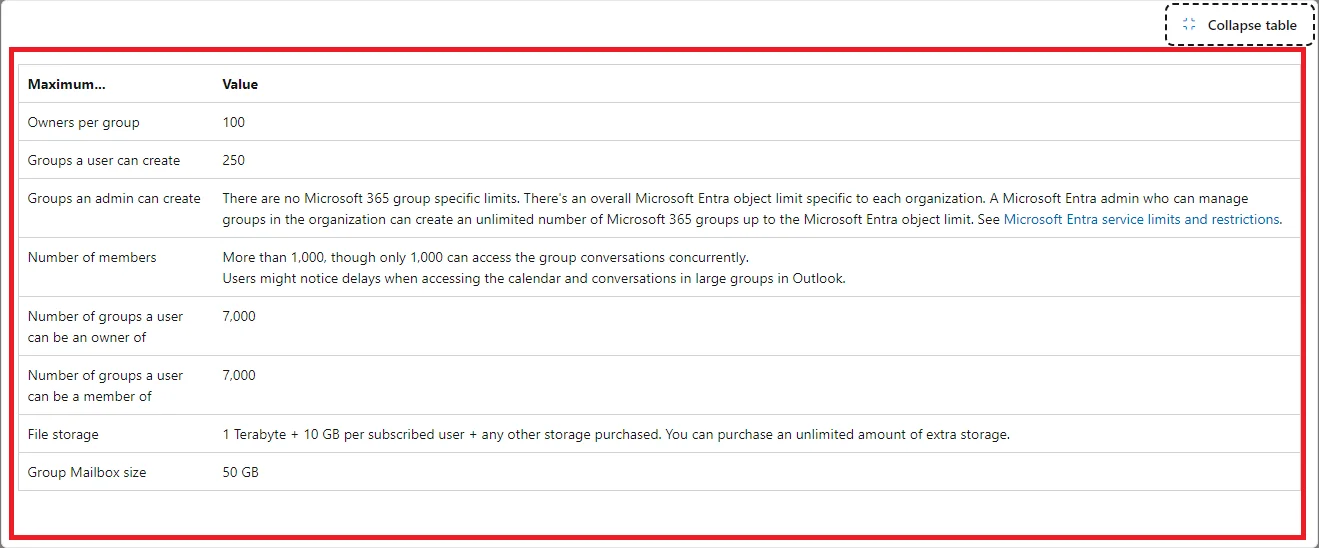
It is an object that is created in Azure Active Directory with a list of people in it. Office 365 Groups have some inbuilt workloads, such as a SharePoint Team site, Shared Exchange mailbox, Yammer Group, Power BI, OneNote, and Planner. You also have the option to add or remove members to the Group.
Basically, Office 365 Groups are available with Exchange online which offers a new environment for collaboration. For example, in a company when a sales team requires input from several people who are not using Dynamics 365. In this situation, they create Office 365 Groups and provide a single location to share documents, conversations, meetings, and notes.
Which Office 365 Plans Include Groups?
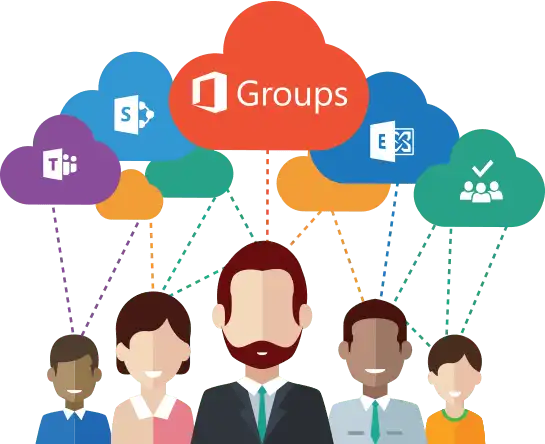
Office 365 offers many plans and every plan has different services. Now, we are talking about which Office 365 plans have an option to create Groups. Actually, Groups are supported by any Office 365 subscription plan that has Exchange Online & SharePoint Online.
It also includes the business essentials, business premium, & the enterprise E1, E3 and E5 plans. Groups are one of the primary reasons why Office 365 is better than Google Workspace Now it’s time to learn how to set up one for your organization/project. Users often express confusion as there is more than one way to complete this task. Not to worry, as we are going to explain each method clearly and concisely.
Admin Level Group Creation in Microsoft 365 Business and Enterprise Edition
Step 1. Login to the EAC with admin credentials, toggle Groups tab on the right pane, and select the Groups option.

Step 2. Click on the “Add a Group” button.

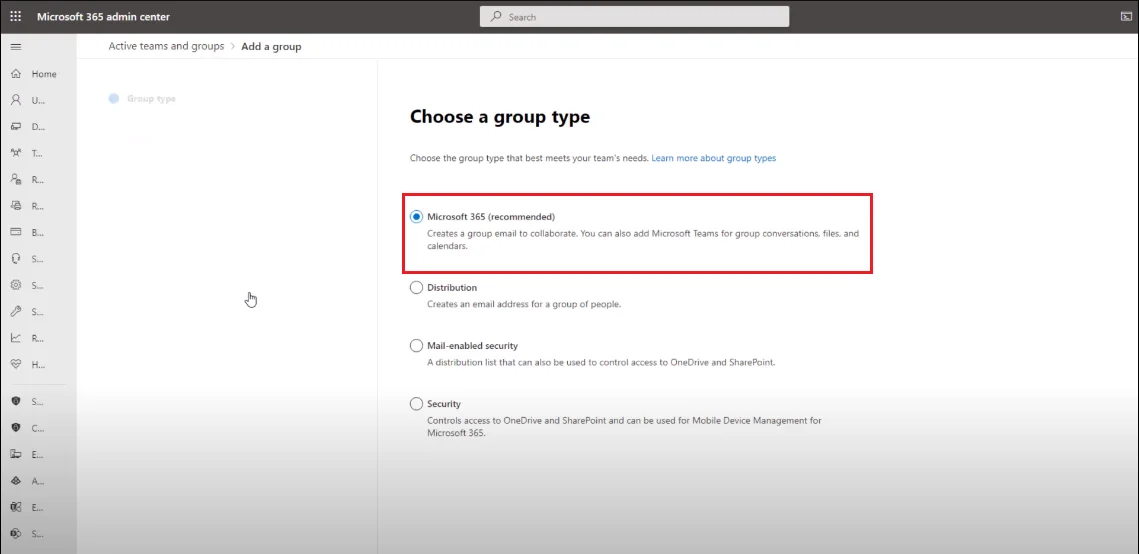
Step 3. This opens a separate portal on your screen where you have to perform a series of steps, starting with the Group Type selection.
Keep the default Microsoft 365 option and press Next.
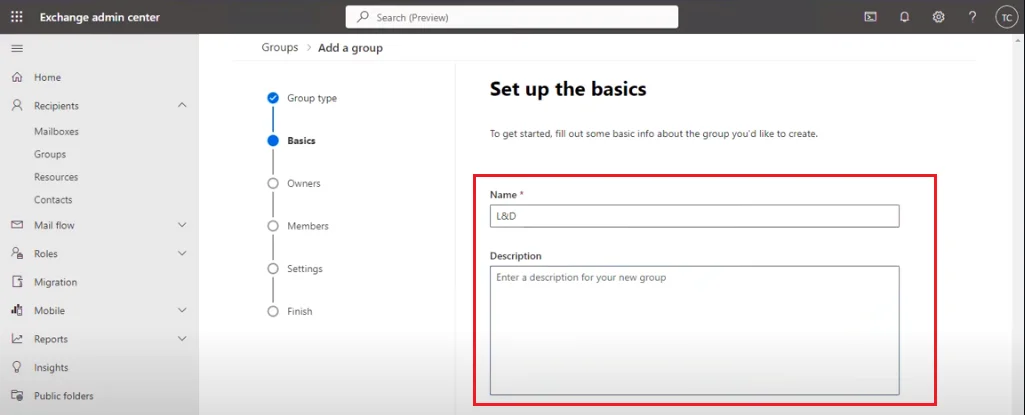
Step 4. The Basics screen is where you name the Group. Type a unique and appropriate name, add a description (this is optional), and press Next.
Step 5. In the Owners screen setting. Mark all the people (up to 20) who are to be responsible for maintaining the group. Press Next.
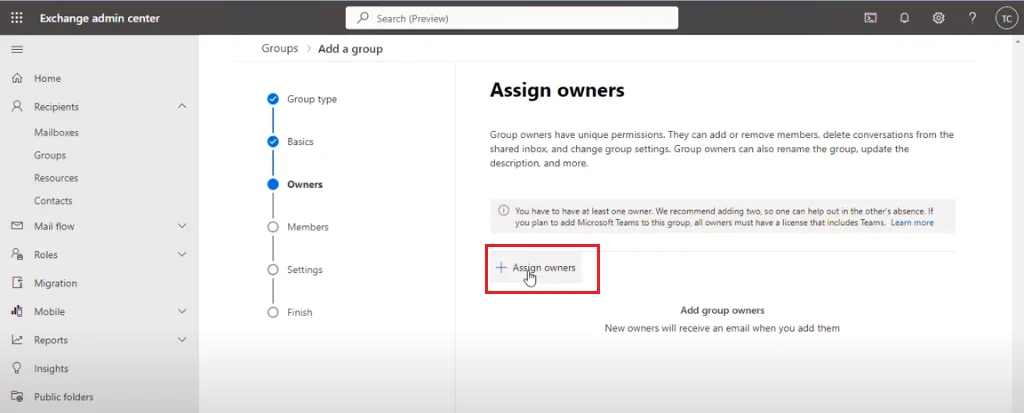
Step 6. After that, fill in the Members page of the group by marking the radio button next to the name of the person. Hit Next.
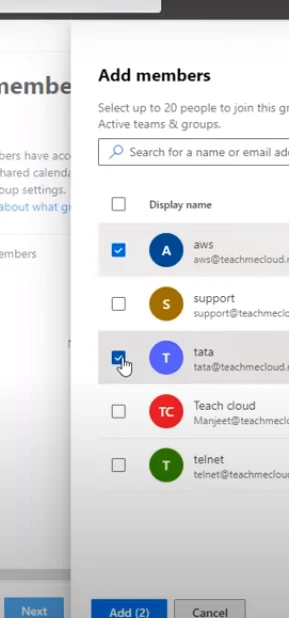
Step 7. Configure the Settings page, by creating a unique group email ID. Pick a privacy option and decide if or not you want MS Teams access for the group. Hit Next.
Step 8. Take a look at the options you set for the group, and make any required changes, then press the Create group button.
Step 9. Finish by Hitting the Close button.
Create Office 365 Groups in Outlook Outlook Web (for free, personal, and family Office 365 plans)
- Log in to your Outlook portal.
- In the left-hand navigation pane, you will find the Groups tab, if you don’t see the navigation panel toggle the Hamburger icon next to the Home button.
- Collapse the Favorite, Folders tabs and expand the Group tabs.
- Inside the Groups tab hit the New Group icon.
- On the portal that opens type a unique name and add a description. Hit Create.
- Add members screen type the email address of the people you want in the group and press Enter.
- Otherwise, you can also click on the “enter a name or email address” bar and choose the person from the list. After that click on Add.
- You can skip member addition by pressing the Not Now option.
- The newly created group should appear within the Group Tab of the Navigation pane, if you don’t see your group refresh the browser.
Outlook Email Client (Classic Version) for M365 Group Creation
The new Outlook email client has yet to receive the group creation option. That’s why here we use the Outlook 2013 edition to give you a browser-free Outlook distribution group creation.
Step 1. Click on the People Icon.
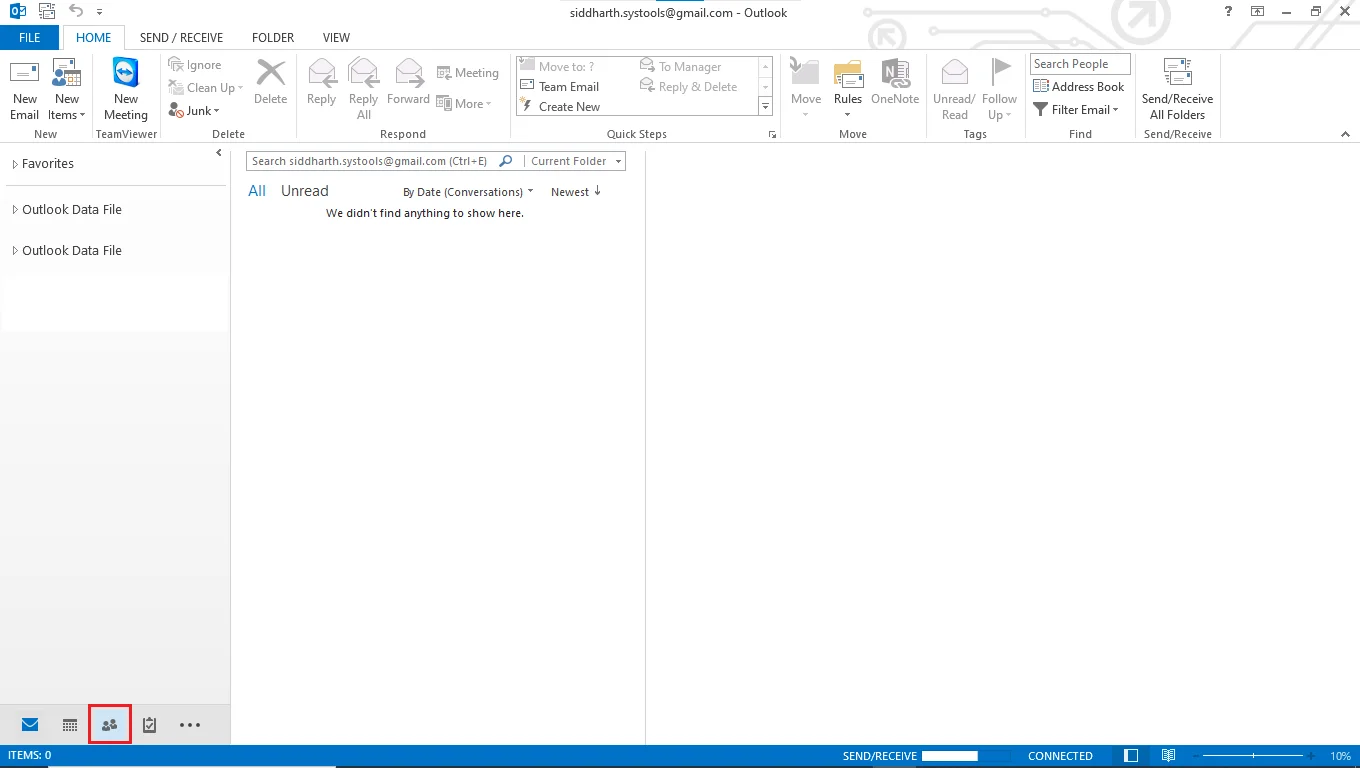
Step 2. Then, select the New Contact Group option.

Step 3. Type a name, and Click on Add Members > From Outlook Contacts.
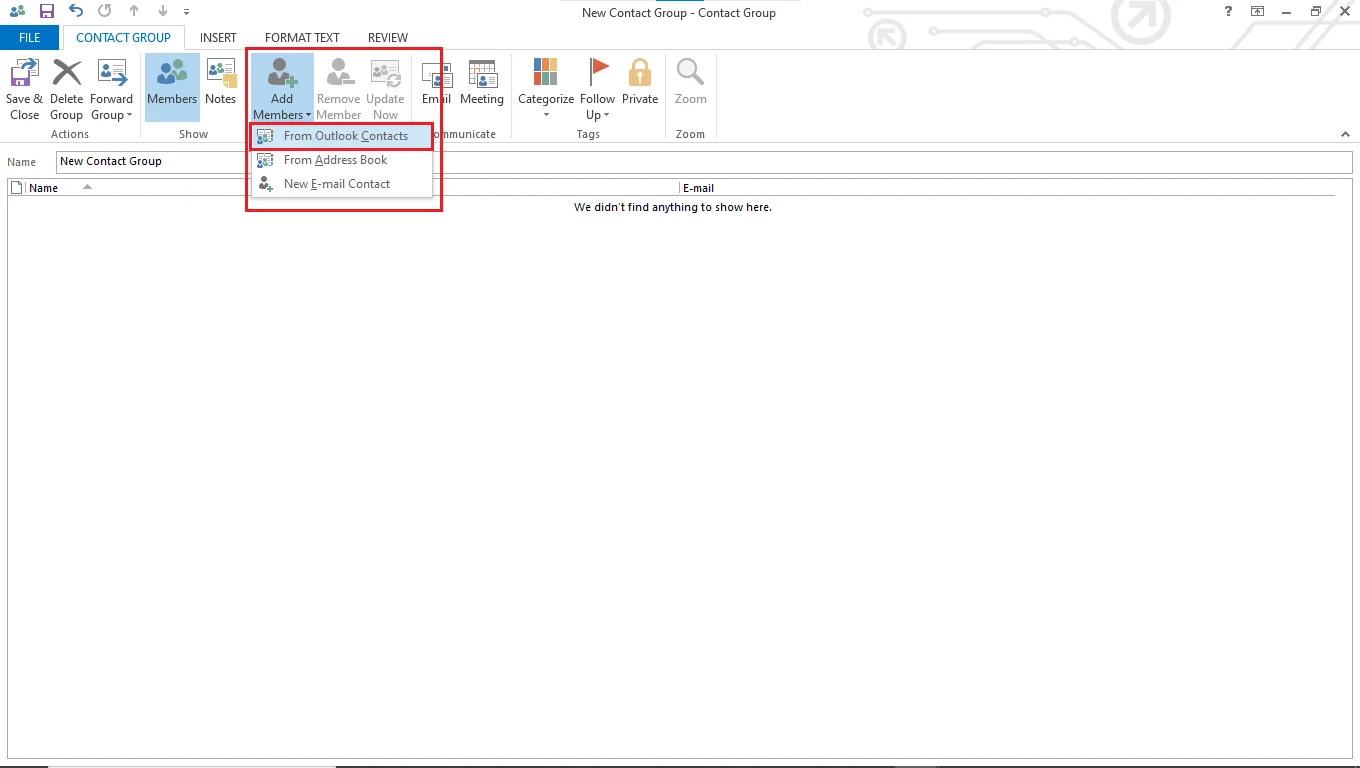
Step 4. Then, In the window that appears select all the people you want to add > click on Members-> then OK.
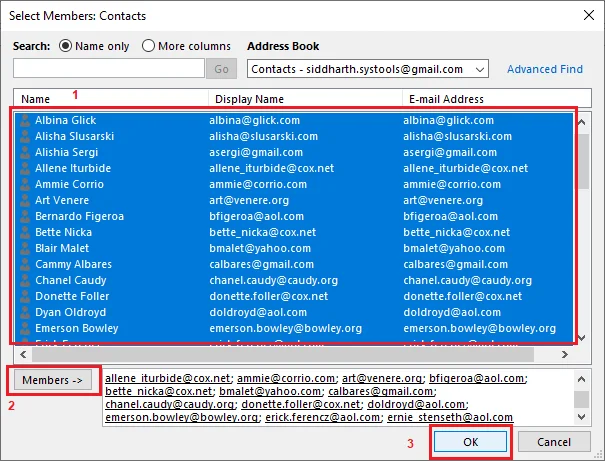
Step 5. Finally, press the Save & Close button and view the Group on your contact list.
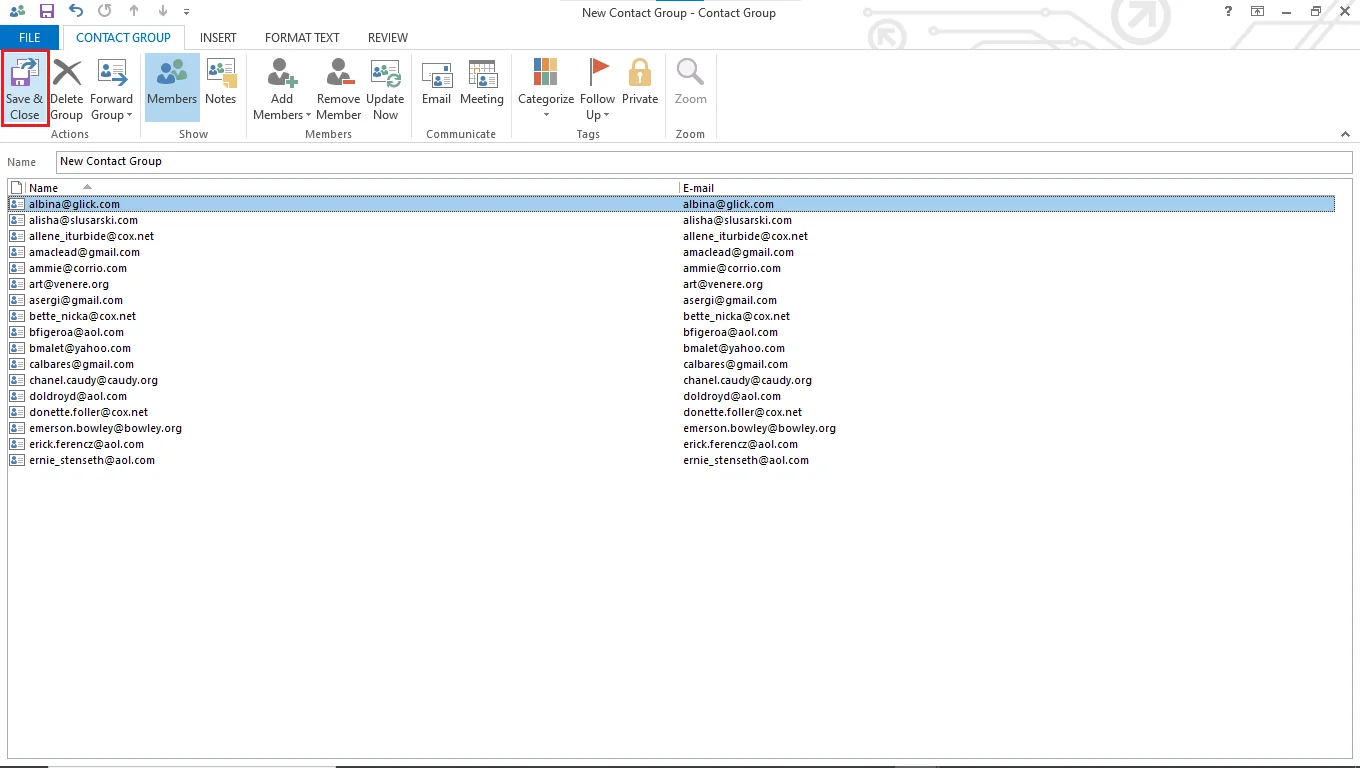
The Group creation in the 2016, and 2019 versions are different and more closely resemble the current version. Here are the steps for those who maintain Outlook 2016 or later. User-side group creation can only be done if IT admins enable the option.
- Open Outlook for Windows. In the Home ribbon click New Group.
- Put the required information about the group including.
- Unique Group Name. (can’t be changed after the setup)
- Group Description: A tagline for what the group is about. Members receive this text in their welcome Mail.
- Pick a Classification: for the Group (options may be missing depending upon your organizational permission)
- Privacy has two default options. The first is Private, which is for keeping the group visible to members only. Another is a Public group, here anyone can see the group and request membership.
- An optional criterion is to “Send all group conversations and events to members’ inboxes ”. With this, you essentially combine users’ regular mailbox with the group mailbox. Moreover, this setting can be updated at a user level as well.
- Once done, press Create.
Workloads Along With the Office 365 Groups
- Conversations – The Conversations helps users to have email conversations within the team by sending or receiving an email to the Groups.
- Files – It allows users to upload all the files related to their project or team. Once files are uploaded then it will be available for all team members.
- Calendar – You can schedule or view the meetings in the Office 365 Groups. And, you are also allowed to view your own calendar in the same tab of the Group.
- Notebook – Notebook of Groups is used to share the updates and meeting points with the whole team in the group. Additionally, you can also create a new section which is password protected.
- Planner – You can create tasks, after that plan them using the planner. However, any tasks that you want to plan as a part of your project can be added to the Planner with appropriate deadlines.
- Site – Sites can upload documents and create new pages, web parts, InfoPath forms, etc. So, when you click on the site, then you can use this for document collaboration & other SharePoint-related tasks.
Conversations Can be Done in Multiple Way
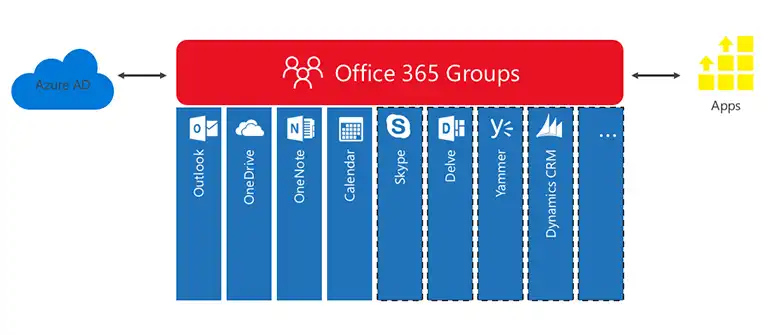
1. Outlook Conversation
When an organization creates an Office 365 Group, then a mailbox is also generated for it. This mailbox gives an option to send and receive an email address through MS Outlook and enables the team members of the Group to communicate by using email messages as a conversation mechanism.
2. Microsoft Team Conversation
Microsoft Team conversation gives an option to create chat rooms or live & persistent conversations. Within these Microsoft Teams chat rooms, team members are allowed to make a channel for isolating some specific conversation topics. Moreover, the interface of this Team is well integrated especially the navigation of Microsoft Team conversation.
3. Yammer (Viva Exchange) Conversation
As we know, MS Outlook Conversations are for emails, and Microsoft Teams Conversations are used for live chat. Yammer (Viva Exchange) is used for the forum, which means it is for threaded conversations. However, Yammer conversations are a little different, because it is not always available with the Office 365 Groups. Moreover, to get an Office 365 Group with Yammer (Viva Exchange) Conversations, people have to create it from within Yammer and Yammer only.
Learn About Microsoft 365 Group Types and Their Differences
| Feature | Microsoft 365 Groups | Distribution Groups | Dynamic Distribution Groups | Security Groups | Mail-enabled Security Groups |
| Purpose | Collaboration | Broadcast information | Send to specific attributes | Grant access to resources | Grant access & email |
| Collaboration tools | Email, Files, Calendar, Stream, Planner, Teams/Viva Engage | N/A |
None |
N/A | N/A |
| External members | Yes: configurable | Yes: configurable | None | N/A | N/A |
| Dynamic membership | Yes (Entra ID) | Not Possible | Yes (Exchange admin) | Yes (Entra ID) | N/A |
| Mobile access | Yes | No | Not Possible | N/A | N/A |
| Send as/on behalf | Yes: configurable | N/A | No | Not Possible | Yes: configurable |
| Nesting | Yes (dynamic groups) | Not Possible | No | N/A | No |
| Add to Teams | Yes | Yes (members only) | No | Yes | Yes |
| Microsoft 365 Group membership | N/A | Not Possible | Not Possible | N/A | N/A |
From this table, we see that the groups form an important pillar in Office 365 security as well. Next up we have some situations that demand a group shift.
What If You Need to Delete a Microsoft 365 Group on Outlook Web?
You can do it easily by following the below steps:
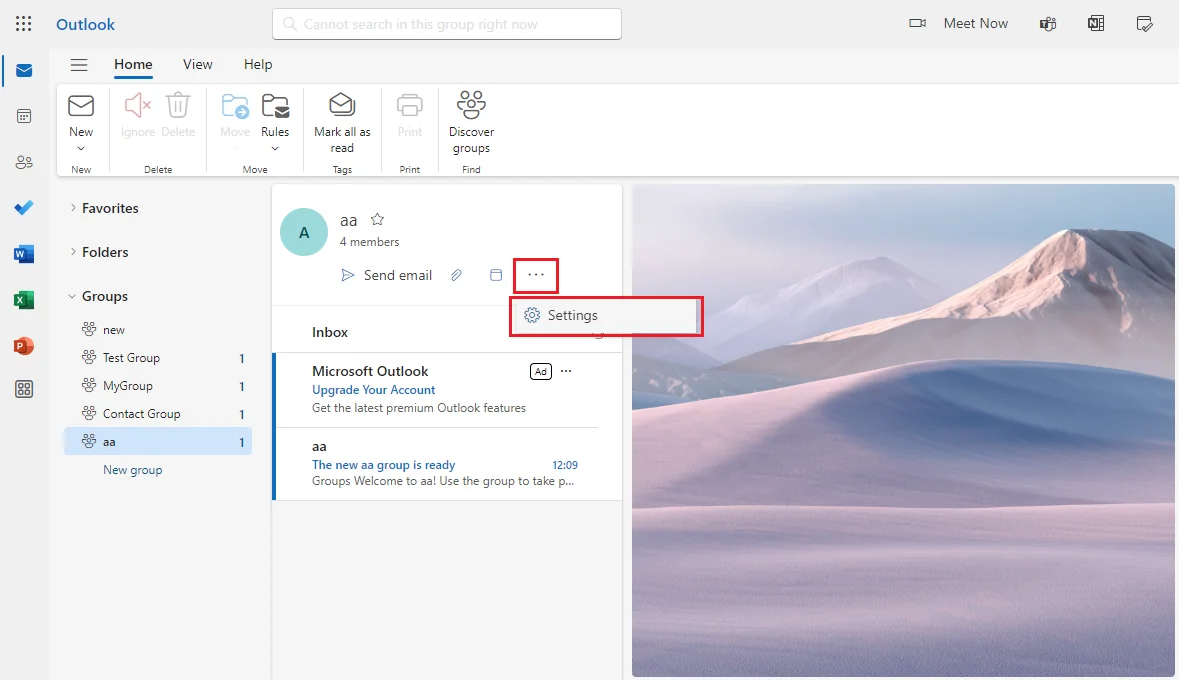
Step 1. Left side pane expand Groups and pick the group you want to delete.
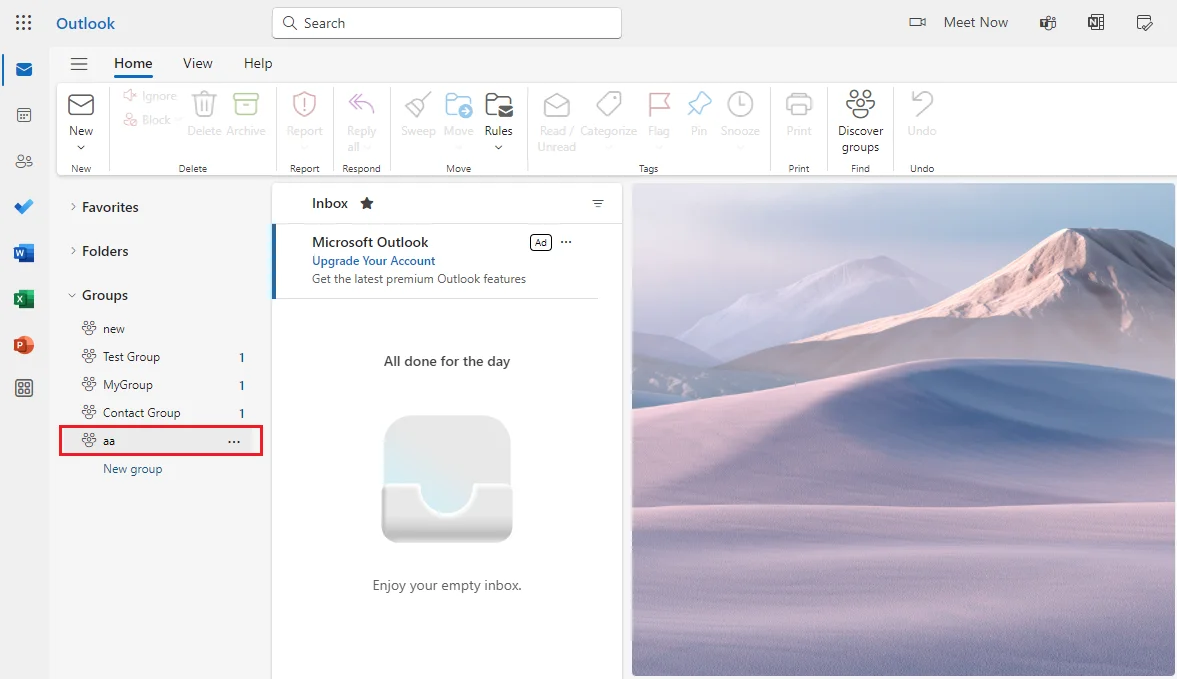
Step 2. Then, click the 3 horizontal dots to view the settings button. Open Settings.
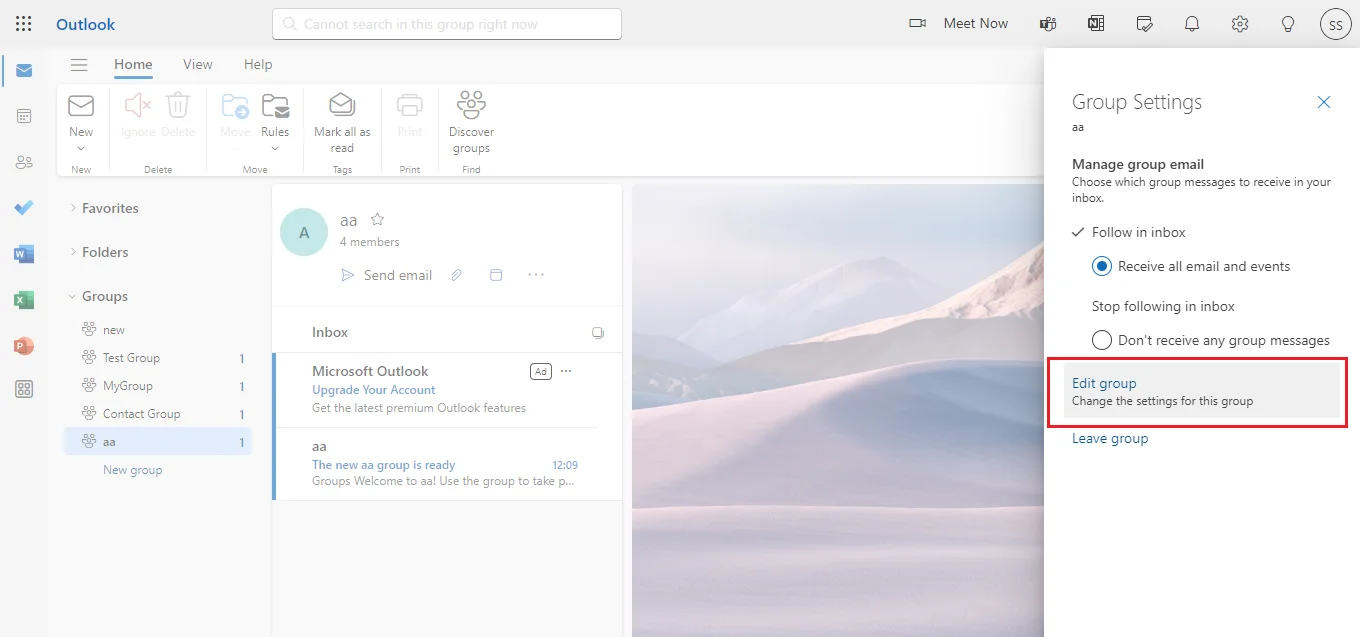
Step 3. From the Group settings pane, select the Edit Group option.
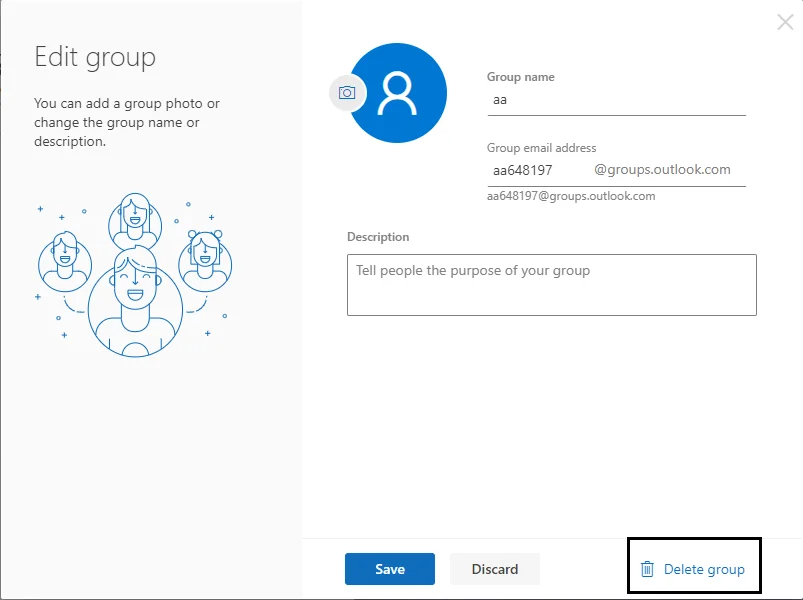
Step 4. Then, click on the Delete Group button located at the bottom of the window.
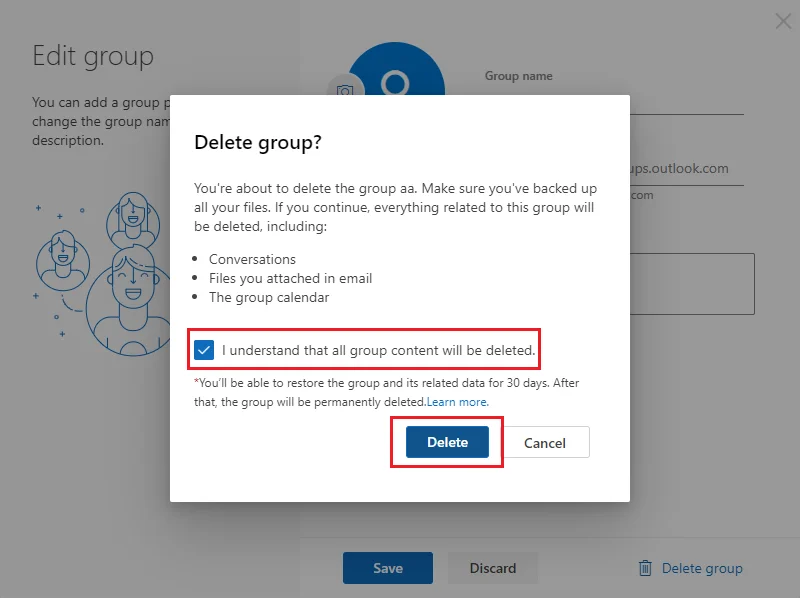
Step 5. Mark the box “I understand that all group content will be deleted” then press Delete.
Scenarios Where Admins Have to Move the Office 365 Groups
- After mergers or acquisitions, admins not only have to bring all users but also the Groups that they are associated with.
- Likewise, when there is a divesture in an organization, there is a highly likely chance that some groups are moved from their original place to a new location.
- Moreover, when an organization upgrades its M365 plan from Microsoft Business to Enterprise Edition, it also wants to keep all groups intact. This is done to preserve the historical data and eliminate time spent reorganizing the structure.
For all these scenarios, you should trust the one and only SysTools Software for Office 365 to Office 365 Migration. It not only allows you to migrate data but also provides different types of reports for analysis and compliance purposes.
Download the demo for free:-
Summing Up
In this blog, we have discussed Office 365 Groups, their benefits, use cases, & how to create Microsft 365 Groups in Dynamic 365. Moreover, in this current era, every organization has a large number of people and teams. And, they need to communicate with each other. In this situation, Office 365 offers the option to create Groups. These Groups are very useful for collaborating with teammates.
Frequently Asked Questions
Q. Who can create groups in Microsoft 365?
By default, every member, except those with guest access, can form a Microsoft 365 group on their own. However, administrators can restrict this privilege and only allow a few designated individuals to form groups. Additionally, even those with the free tier of Outlook can make their O365 group.
Q. What are Microsoft 365 groups used for?
Microsoft 365 Groups is a service that levels up your collaboration. So you can use it to send/receive emails in mass. Moreover, users create it to work together on projects, schedule meetings, and communicate in a separate, secluded environment.
Q. Is the M365 group the same as the Teams and Yammer groups?
No, they are distinct but connected entities. Users, even those in the free tier of the Microsoft 365 plan, can add the Office 365 group in their team chat. Moreover, it can be done by using the group email ID. However, Yammer (now Viva Engage ) is entirely a premium service and has its own set of uses.
Q. What are the resources included in a Microsoft 365 group?
Users get access to a shared Exchange mailbox, calendar, and all the contacts inside a Group. On top of that, your organization can enable Teams, Viva Engage (Yammer), Projects on the Web, and Roadmaps. Not to mention SharePoint and a connected OneNote Notebook.

