How to Recover Mailbox from Failed Exchange 2016 Server? Complete Solution
Summary: This write-up provides you the real scenarios, reasons and methods to recover mailbox from failed Exchange 2016 Server.
Microsoft is upgrading their Exchange Server services, features, security, etc… in order to keep the mailbox data safe and secure from various errors or corruption, server crash or failure issue. The Exchange data is very crucial for the IT organization and other industry vertical.
MS Exchange render tools and cmdlet to get over with these problems but before proceeding towards the solution, let’s look at the real scenario or users query they are facing when their Exchange 2016 Server failed and they want to recover the mailboxes from that failed server.
“Hlo floks! While I was moving my Exchange Server 2016 to the other one, the server crashed and from that onward I am unable to access the Exchange database mailboxes from that server. Can anyone provide the method to recover mailboxes from failed Exchange 2016 Server. So, that I can again access my Exchange mailboxes and its data.”
Note: Before recovering mailboxes from the failed Exchange Server 2016 it is important to know find out the actual root cause of this problem. The issue occurs from anything such as: corruption in database or the users aren’t able to access the EDB mailboxes.
Solution to Recover Mailbox from Failed Exchange 2016 Server
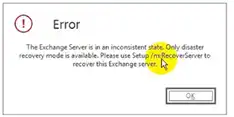
Users can use the Setup /m:RecoverServer tool provided by Microsoft. It is basically a command which reads setup instruction of Active Directory (AD). After gathering all the information there are chances that the actual Exchange files & services are installed on the Exchange Server and AD (Active Directly) will restore all settings as well as roles that are stored or saved in it.

Points to Remember While Recovering Mailboxes from Failed Exchange 2016 Server
The first and foremost thing is to verify or check the location of Exchange Server files where it is installed. The default location is given below:
%programfiles%\Microsoft\Exchange Server\V15
If you are unable to find it then there must be a changes that users have use the /TargetDir setup. So, in order to get the server files follow the steps given below:
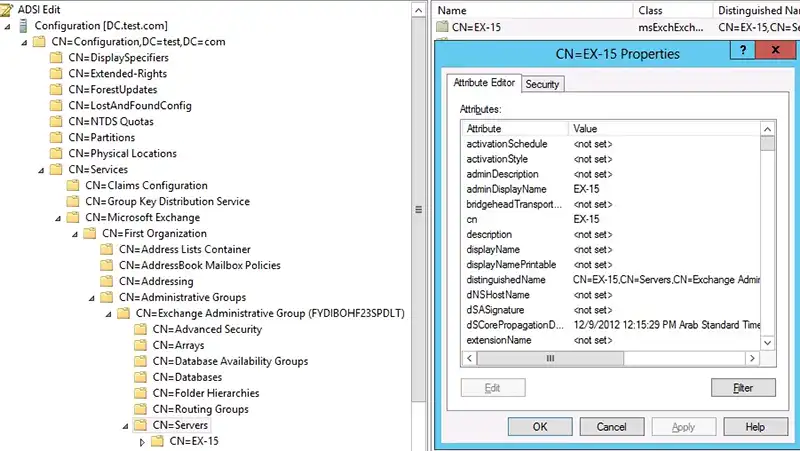
Step 1: Press Win + R key to open the run dialogue box >> Insert “ADSIEDIT.MSC” cmdlet. From this the LDP.Exe tool will open
Step 2: Then, navigate to the location given below:

Step 3: After that select the object and then click on properties in the Microsoft Exchange Server

Step 4: Then, find the msExchInstallPath which contains the MS Exchange current installation location
Use Setup /m:RecoverServer to Recover Mailbox from Failed Exchange 2016 Server
Step 1: Obtain truncation lag or replay lag settings for copies of any Exchange mailbox database that is on the server and it is recovered by using the below command:
Get-MailboxDatabase DB0 | Format-List *lag*
Step 2: Then remove or eliminate the Exchange mailbox database copies which coexist on the server. For this you can use the cmdlet mentioned below:
Remove-MailboxDatabaseCopy DB0\MBX0
Step 3: Now users have to erase the failed Exchange Server configuration from DAG (Database Availability Group) via using the following command:
Remove-DatabaseAvailabilityGroupServer – Identity DAG0 -MailboxServer MBX0
Step 4: After that, navigate to the command prompt window and run this command:
Setup /m: RecoverServer
Step 5: The recovery setup process is completed now by using the Add-DatabaseAvailabilityGroupServer >> Add the recovered server to DAG via using this command: Add-DatabaseAvailabilityGroupServer – Identity DAG0 -MailboxServer MBX0
Step 6: Then use the Add-MailboxDatabaseCopy cmdlet to reconfigure the Exchange mailbox database copies after Microsoft Exchange Server is added to DAG. Add-MailboxDatabaseCopy – Identity DAG0 -MailboxServer MBX0.
After executing the above cmdlet the recover mailbox from failed Exchange 2016 Server is successfully completed. The next step is to place the database in the correct place by mounting the certificate in the MS Exchange Server.
Even after that if users are unable to access the Exchange mailboxes data items, this could be because of corruption in the EDB file due to which users are not able to view or open Exchange mailbox items.
Note: To recover the offline/dismouted .edb file from corruption users can use the SysTools Exchange Server Recovery Tool which is the advanced software used by many IT professionals and Exchange as well as Novice users to repair EDB file and mailboxes from corruption without using any command. This recovery manager for Exchange database utility support both offline/dismounted EDB file (Public & Private) and it provides Quick and Advance scan mode which fix Exchange database corruption easily.
After recovery, users can extract mailbox from EDB file Exchange 2016 / 2013 / 2010 / 2007 / 2003 and export recovered EDB mailboxes to Live Exchange Server, Office 365 and various file formats in a simplified manner.
Bringing It All Together
This article provided the complete information to recover mailbox from failed Exchange 2016 Server by using the manual solution provided here. After restoring the server, users have to recover the Exchange database file from corruption and for that, you can use the advanced solution provided in the above section which easily resolves database corruption Exchange 2010, 2013, 2016 and recover as well as repair Exchange mailbox & EDB file with no data loss in a hassle freeway.

