Pen Drive is Write Protected – Know How to Make
The way with which one can restrict the data of a pen drive or flash drive for editing is known as Write Protection. When write protected pen drive is yours then one more restriction will be not having rights for deleting existing data within pen drive. Oftentimes, this protection will not permit you to format the pen drive.
In this write up, couple of methods is given for removal of pen drive write protection. Unfortunately, most of times you may not find appropriate results with these solutions. But you can try any of these once.
Removing Write-Protection From Registry Using Regedit.exe
Run Regedit.exe on any computer installed with Windows OS, Go to start ->Search Program or file-> make search for regedit
Or run command Regedit.exe
Under the Registry Editor window:
Execute the command:
Computer\HKEY_LOCAL_MACHINE\SYSTEM\
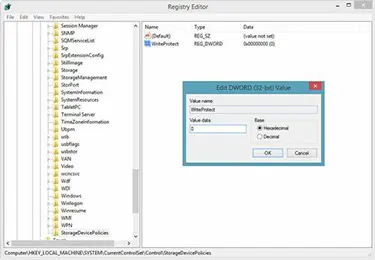
CurrentControlSet\Control\StorageDevicePolicies

- WriteProtect value -> make double click on it
- You will get the WriteProtect at right-hand panel
- Alter Value data to 0 from 1
- Move on with click on OK tab
- Close Regedit
- Restart the computer
- Connect the pen drive within the system
- Probably the pen drive is not write protected
Want to format it:
- Right-click on the drive -> choose Format tab from enlisted results -> a pop-up window will open including the basic information of pen drive -> Quick format ->Ok

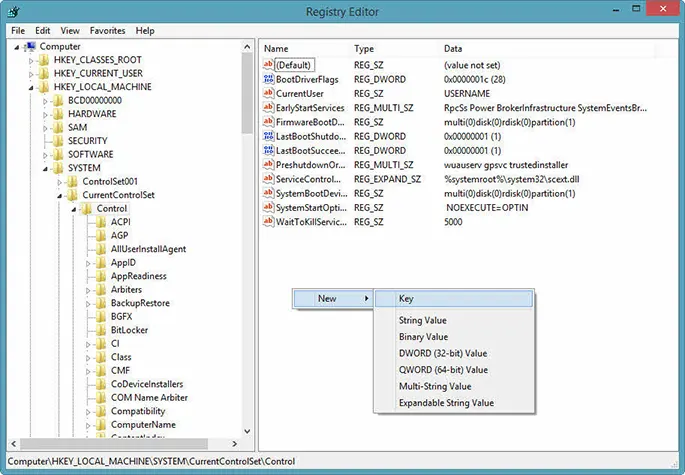
If you are not getting StorageDevicePolicies, you need to create a key ->right-click at the white space of the registry editor wizard -> New -> Key (provide a new name)
Make double click on the newly created key folder -> choose New -> DWORD. Rename it as WriteProtect, set the value to 0 by removal of existing value. Follow Ok tab and restart the system.
If this method does not work, you can try the other mentioned above.
Diskpart Command

Need to launch a command prompt with the search for cmd.exe from Start menu (for Windows 8 go with Start screen). Windows XP users need to follow “Start” tab then opt Run command, enter cmd.exe in the box.
Note: If you do not have Access to do the same then, run Cmd.exe with admin rights.
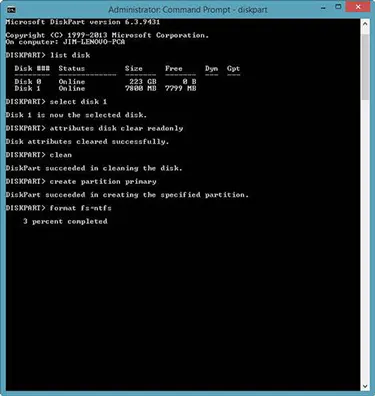
Commands you need to type :diskpart> list disk
Get the list of disks
Choose the one you want to format say it is disk 1
diskpart> clean
for cleaning the data from disk
diskpart> create partition primary
create disk partitions
diskpart> format fs=fat32
exit

