How To Lock And Unlock A Word Document: Explained Here
MS Word documents are widely used to store vital information of users. Sometimes few of those files carry sensitive information and thus require to be protected. For such scenarios MS Word itself provides a brilliant opportunity for users to lock and unlock the word files so that data cannot be altered or misused by any unauthorized users. The following segment of this guide will help you to rightly perform the process of locking Word files as well as unlocking word files.
How To Lock MS Word Files?
Users can protect the word files data by applying a password to them. By doing this whenever user tries to open the word file, MS Word will prompt for password to open respective file. Let us tell you how, open the document that you want to lock and click on ‘Save As’ option. Now a dialogue box appears on your screen, click on “Tools” option provided at the bottom left part of the dialogue box.

Clicking on ‘Tools’ option will provide you list of options, choose ‘General Options’ from the list and proceed further.

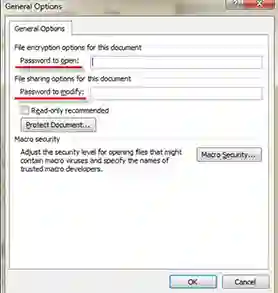
When you will click on General Options, a new dialogue box will open and prompt you two fields i.e. Password to open and Password to modify.

Now provide a password to “Password To Open” field that will restrict users to open MS Word files. And at the same time provide a password to “Password To Modify” option to restrict users to alter any content of Word files. Click on ‘Ok’ to complete the process of locking word files.
There is also a second method to lock word files in MS Word which is as follows:
Open MS Word file and go to ‘Review’ tab (The following screenshot is valid for MS Word 2010). Under review tab go to Protect > Then click on ‘Restrict Editing’ option.

Clicking on ‘Restrict Editing’ option will provide two options one as ‘Formatting restrictions’ and another is ‘Editing restrictions’. Enable option ‘Allow only this type of editing in this document’ and select option ‘No Changes (Read Only)’ from the list of options.

Now move to the text part of the word file and select the portion of text which you don’t want to protect. You can use Control key to select the multiple portions of text. The portion left unselected will get protected.
Choose “Everyone” option provided under Exceptional (Optional) tab if you want to protect it from everyone. Else the option is a non mandatory field you can leave it as it is.
Finally click on ‘Yes, Start Enforcing Protection’ to protect the word documents. Clicking on the option will appear a dialog box on your screen as shown below:

Provide a password of your choice to protect the file and click on ‘Ok’ to proceed. The selected portions of your file get protected.
How To Unlock A Word Document?
After protecting a word document, whenever you open your file it will prompt you for password. Provide the password and open your document, but now we will show you how to unlock a word file in case if you require removing password restrictions from word document.
- Open the word file and provide a password to open. Go to ‘Save As’ option from MS Office button.
- Click on ‘Tools’ option provided at the bottom right corner of the dialogue box that appears on your screen.
- Select ‘Security Options’ and remove the password fields, click on Ok to remove password.
- For unlocking selected fields of word files simply press Control + Shift + F11 keys simultaneously.
Hence, your files will be unlocked but in case if you have password protected word files and you have forgotten the password of those files, follow under mentioned steps:
- Copy the contents of respective word file by right clicking on it and open a new word document.
- Paste the copied content of word file in new document and go to Review tab.
- Open Protection tab and choose ‘Restrict editing and formatting pane’ and click on ‘Stop Protection’.
- That’s it! The word file will be unlocked.

