

Hard disks, which are the primary storage devices on your computer, need to be formatted before you use them. Formatting a disk means configuring the disk with a file system so that Windows can store information on the disk.
Format a hard drive lead to the deletion of all hard drive data stored on it. Formatting hard drive can be categorized into two types: Quick format and Regular format.
Regular format: When you choose to run a regular format on a volume, files are removed from the volume that you are formatting and the hard disk is scanned for bad sectors. The scan for bad sectors is responsible to make you sure that your drive is in healthy mode or not.
Quick format: If the quick format option is chosen, format process removes files from the partition, but does not scan the disk for bad sectors. Only use this option if your hard disk has been previously formatted and you are sure that hard disk is not damaged.
How To Format A Hard Drive: Partitions
Before formatting of hard drive partitions process is carried out, it is important to first understand about partitions. Hard drive data storage can be divided into smaller sections or parts which is called partitions. Formatting or single partitions can be executed without affecting the other partition. This can be useful in certain situations but what if you want to format the entire hard drive.
How To Quick Format A Hard Drive?
Windows Vista, 7 and 8 have a built-in Disk management tool. Just go to Start Button >> Computer >> right click on the Hard Drive you want to wipe. Choose format from the menu and a new Window will appear with a few formatting options.
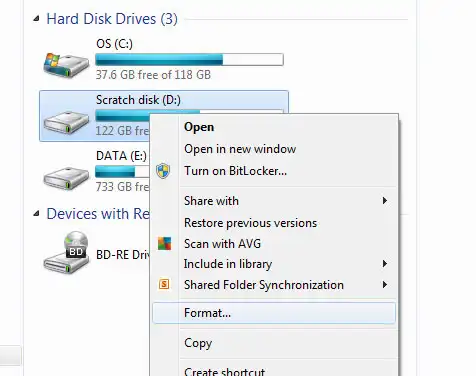
By default quick format option is checked, you can choose the file system and allocation unit size as well as changing the volume label (the drive’s name). Generally, you can leave all the settings unchanged and carry on with the ‘Start Button’. Within a minute your hard drive will be formatted.
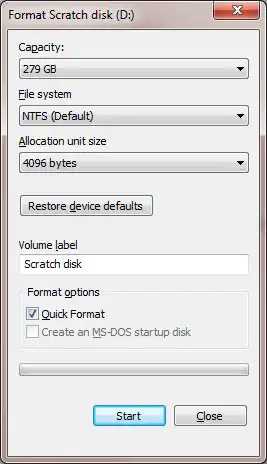
You should choose NTFS file system if it’s not already selected for Windows Vista, 7 or 8.
Using Built-in Disk Management Tool
Disk management tool can be open in two different ways one is to type diskmgmt.msc into the search box in Vista or Windows 7 and then click on only result that appears in the menu above with the same name.
The second method is to find it in the Control Panel, if you search for the ‘Disk’ or look under the Administrative tools section, where it is called ‘Create and format Hard Disk partitions’.
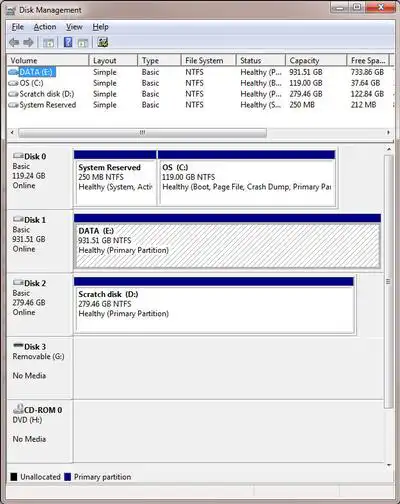
When the tool loads, it will analyze all your computers drives and will prompt you to initialize a new disk that it finds.
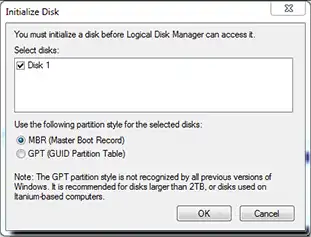
If your hard disk is larger than 2TB, you should opt for GPT (GUID partition table). This setting also lets you create more than four partitions.
If you don’t see a prompt, look in the list of drives and you see one that says ‘Not Initialized’. Right click on it and choose Initialize Disk.
Once it is done, right click in the hatched unallocated space and choose new simple volume.
Follow the instructions, and choose how big you want the partition to be (in MB 1024GB=1GB) and which drive letters you want.
When you come to format the partition, our advice is the same as in the Quick Format section above.
If you select a size for the partition that’s smaller than the total capacity of the drive, say 500MB on a 1TB drive, you will end up with some unallocated space on the drive which you can format by repeating the process you have just completed.


