Microsoft Rolls Out SQL Advanced Threat Protection for Azure SQL Database – Explore How to Install
Introducing the new SQL Advanced Threat Protection. Bringing a new way to manage database vulnerabilities & protect them from cyber-attacks across the complete Azure SQL Database server.
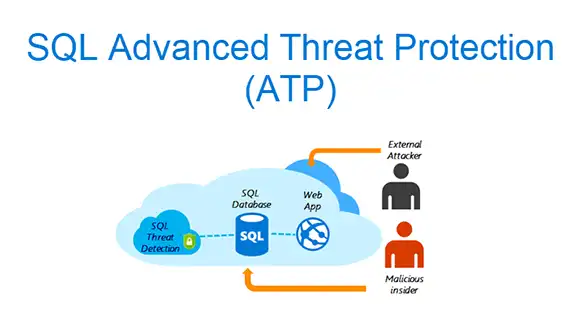
Microsoft released a new strong security feature for Azure Cloud SQL database named as SQL Advanced Threat Protection or SQL ATP. It is a one-shop-stop cloud service that resolves and protect extreme database vulnerabilities from the insider threats and cyber-attacks. It comprises functionality like Data Discovery & Classification, Vulnerable Assessment, and Threat Detection. However, data discovery and classification segment are at the preview stage and SQL Vulnerability Assessment is released with “general availability” status.
Microsoft Advanced Threat Protection (or ATP) is available for Microsoft Azure Database users as well as SQL Server users. The Vulnerable Assessment for on-premises SQL Server can be accessed through SQL Server Management Studio (or SSMS). SSMS is used to manage SQL infrastructure and create all components of SQL Server, Azure SQL Database, and SQL data warehouse proficiently.

Azure SQL Advanced Threat Protection Pricing
The SQL Advanced Threat Protection pricing comes under the Azure Security Center Standard tier. Typically, the standard tier comes along with 60 days trial period. After the 60 days, it will charge accordingly to the standard rates. Usually, the ATP pricing is $15/node/month, where one node is equivalent to each protected SQL Database server.
How to Use New SQL Advanced Threat Protection or SQL ATP in Azure SQL Database
To utilize the full functionality of SQL Advanced Threat Protection (ATP), follow the given instructions:
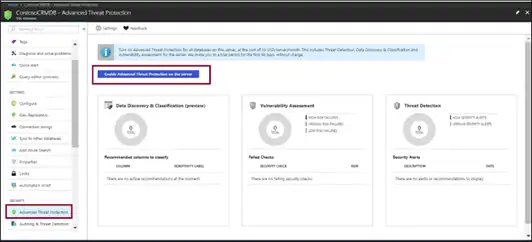
1. From the Azure SQL Database Window, click on Advanced Threat Protection under the Security option. Moreover, to enable SQL ATP for all databases available on the server, click on Enable Advanced Threat Protection on the server option as shown in the screenshot.

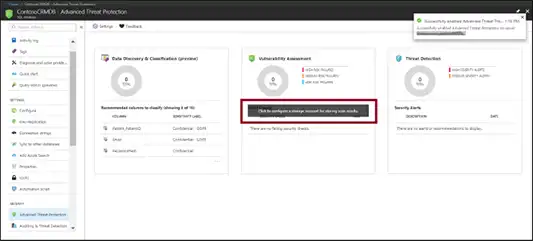
2. To enable Vulnerability Assessment or VA, click on Vulnerability Assessment card and add a storage account where the scan results will save.

Users can also pick or create a storage account for saving scan outcome. Here, users can also switch On Periodic recurring scans to set-up VA (or vulnerability Assessment) at automatic scan cycle once per week. The complete scan report will auto-sent to the email address of the user.

3. Now, click on the Data Discovery and Classification card to view delicate columns to classify and categorize the data with persistent sensitivity labels. Click on Vulnerability Assessment card to see and manage scan report and check the security status. In a case, if the security threat alerts have been received, then click on Threat Detection card.
4. To manage the Azure ATP settings, browse to Advanced Threat Protection option under the Security from the SQL Server panel . With the help of this page, users can easily control and modify the Advanced Threat Protection settings for the complete SQL Server.

5. In such situations, when user wants separate threat detection alerts for an individual database, then check the corresponding Enable SQL Advanced Threat Protection at the database level checkbox. Once the checkbox is marked as selected, click Threat Detection settings for this database and then provide the required settings information for the database.

6. Alternatively, the Advanced Threat Protection settings of the server can be viewed from the ATP database pane. To do this, click on Settings, and then select View Advanced Threat Protection server settings.

The Bottom line
It is evident from the above that Advanced Threat Protection is a major overhaul of Microsoft Azure SQL Database. So, it is better to take the subscription of SQL ATP and protect the crucial enterprise database from the risk of cyber-attacks. Hence, in this blog, we have described the overview of ATP and how to enable SQL Advanced Threat Protection on the server.

